Hey, hey! We made it to midweek! Wahoo!

Today is another fabulous Stamp Out Chaos post, and if you are new to it, I will esplain. My crafty friend, Katie and I decided to tackle our craft spaces by sections, so every couple of weeks, we take on a new category of supplies to purge, organize and make happy! This week, tools. I personally don't feel like I have a ton in this category, but I know I have plenty, and it can always use some help. If you happened to stop by Katie's blog lately, she did an awesome post about minimizing and owning less. I have been doing so in my home, and have found that it translates to my craft table as well. I just don't need it all, and will never USE it all either.
So, let's begin with where I have placed things, and I will walk you through some of the ways I organize my papercrafting tools. I have found that it works well for me to have things well within reach or in eyesight, or I won't use it. That can be a problem when it is all out in the open...yikes! I have for the most part gotten over the "it doesn't look pretty" mindset. It was necessary to my kind of storage.
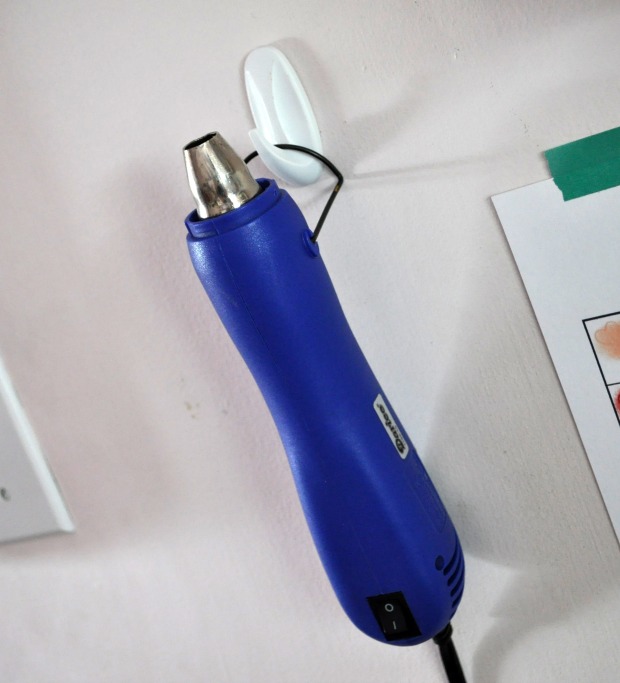
First, my heat tool. I love this thing, as cheap as it was, it works and I love using it. A simple 3M command hook holds it right where I can reach it, and yes, I took off the plastic heat shield. I have no idea why. lol!

Next to my heat tool, and you've seen this IKEA rail basket before, but I keep these three tools handy and within reach. I love the We R Memory Keepers Corner Rounders and Crop O' Dile.

Next, right in front of me, hangs another IKEA rail system basket, where I place some basic tools, like my Tiny Attacher, scissors, Tape runner, and stamp press. Super handy having it right there.

On my right hand side, sits my Bigshot. Next to my heat tool, this bad boy gets a workout, and I love having it close at hand.

Speaking of having it close at hand, my dies, embossing folders and extra plates are in my cube storage next to my table.

Below this, I have an open cubbie that holds my WRMK score boards, Big Bite, large Martha Stewart board, more border punches and an extra trimmer.

In a drawer above that, I store my punches. I don't reach for these as often as I used to, but they are still handy in this drawer next to me.

Last, back to my desk, are my distress inks and daubers. Now, my wonderful husband had begun to make me an ink shelf but it just didn't work out the way he wanted. He is still going to make me something, but it might be awhile. In the meantime, these inks are right where I can reach them. And, so are the ink blending tools! I labeled each dauber and put them in color order in my bin.
Phew! You've made it this far, yeah! How about a card using some of these tools?

I used a Tim Holtz Bubble stencil, and applied some distress ink using the Mister. I then stamped and embossed some leaves from the Petals and Stems Avery Elle set, and using a tool I didn't picture, my sewing machine, I attached the vellum and a piece of patterned paper trimmed with pinking shears, together.

I then took the adorable Storybook set, and cut and colored the duck, as well as some butterflies, using Distress Markers. The sentiment came from the Thanks A Bunch set, which I heat embossed in white. I then added some colorful sequins!
Thanks for sticking in there with me! I hope you gained a few ideas and enjoyed! I will be back soon. Have a great day!


Great storage ideas, and I love the card, the embossed leaves on the vellum are a great addition. I love your new blog header too!
ReplyDeleteThank you so much Miriam! :)
DeleteBrilliant post! Can I use say that the hook for the heat gun is off the hook?! Seriously, you are an organizational genius!!!!
ReplyDeleteYay! Lookin' good Lindsay! Your card is adorable!
ReplyDeleteI like the storage ideas you shared, I think I will adopt the heat tool one. Your card is cute !
ReplyDeleteGreat storage ideas.your card is just adorable ...love the embossed leaves on the vellum.
ReplyDelete