Thursday, February 28, 2013

Moxie Fab World Tuesday Trigger: Pattern Play

Hiya!

Just stopping in to share my card using the latest Tuesday Trigger over at The Moxie Fab World.


For my card, I chose to go super, super simple.  I took the colors from the gorgeous inspirational pic and created this CAS card.

Sorry to post and run, thanks so much for stopping by!


Supplies-
Paper: Oatmeal Wplus9
Stamps: Embroidered Bouquet Wplus9
Ink: Gold Encore Tsukineko; French Lavender, Merlot, Island, Limeade Fresh Ink; Lichen A-Muse
Embellishment: Pearls Hero Arts
Tools: Corner Rounder WRMK

Wednesday, February 27, 2013

Here For You Anytime

Hey!

I am up today, on The Craft's Meow blog with a card using Vintage Clocks.    


For more details, check out the blog!  Thanks for stopping by!


Tuesday, February 26, 2013

Wplus9 Monday Mood Board #3

Hello!

Last night during my crafty time, I managed to get two cards made for the Monday Mood Board over on the Wplus9 blog.  I love pink, and even more so when combined with gold! For some reason, I pictured brown in there, so excuse that part, lol!  Dawn put together a lovely mixture of pink, white and GOLD!  


For my first card, I stamped the frame image from Very Vintage Florals and added die cuts of the flowers (LOVE), stamped in pink and the leaves in gold.  I then layered them onto my card, as well as two butterflies rubbed in gold ink.


For my second card, I stamped the large floral image from Embroidered Bouquet in gold ink and added some flowers in pink, which I cut out and popped up with foam.  I then added some pearls and stamped my sentiment.


So, yeah, there you go.  Oh, and I decided to ditch the light box for now.  Good ol' daylight and photoshop, ahhh, that's much better!


Thanks for stopping by!  Have a great day!


Saturday, February 23, 2013

Lucky Stars

Hey there!

So, during my crafty time last night, I played around with Lifestyle Craft's Nesting Star Dies. I came up with two easy, CAS projects.


For this, I die cut a large star from a Studio Calico 6x6 paper pad, then die cut a smaller star out of the center.  I popped up the star on my card base, and stamped my sentiment in the die cut center.  Last, I added a bit of red twine.


For the next card, instead of die cutting out the star, I impressed it into the white panel.  I know it's kinda hard to see. Taking three smaller sized stars, I simply added an embossing mat underneath the cardstock, removed one tab on my multipurpose platform and kept the same sandwhich.  I then went a little crazy with the rhinestones, love me some bling!

I have been trying out my new light tent recently and adjusting the settings on my camera, but I just can't seem to get the right mix of light and shadow.  Any tips you might be able to offer?  I think I might just lose my mind from bad photos, lol!  Thanks for any help!

BTW, to get your hands on these dies, check out the Lifestyle Crafts store and enter NOTETOSELF at checkout to score 20% off!

Thanks so much for stopping by!  Have a great day!


Supplies-
{Red Patterned Paper Star}
Paper: Marshmallow Bazzill
Patterned Paper: Studio Calico
Stamps: Darling Sentiments Hero Arts/Studio Calico
Ink: Cherry AMuse Studio
Embellishment: Twine Whisker Graphics
Tools: Nesting Star Dies Lifestyle Crafts

{Rhinestone Stars}
Paper: Licorice, Marshmallow Bazzill
Stamps: Darling Sentiments Hero Arts/ Studio Calico
Ink: Onyx Black Versafine Tsukineko
Embellishment: Clear Rhinestones Michaels
Tools: Nesting Star Dies Lifestyle Crafts

Friday, February 22, 2013

Tuesday Trigger: Set the Table

Happy Friday!

I am so thankful for the weekend, ahhh, sigh of relief!  During my crafty time last night, I played around with the inspirational photo from this weeks Tuesday Trigger.  All is saw was gold, so trendy right now.  


I had just purchased a sheet of Foil paper at the craft store and had to use it here.  I die cut circles (inspired by the plates), and then cut out their centers.  Before adhering them though, I took a paint brush and a splash of Mr. Huey's Silver mist and swiped it across the front.  I then layered my gold circles over top with foam, stamped my sentiment in gold ink, and added a few stars to the card front.

Here is a looksie at the picture.


After I was done, I realized I had forgotten to distress my gold circles as I planned to do, so ya know, picture it that way.  ;0) Thanks for dropping by!


Supplies-
Paper: Putty Bazzill Card Shoppe, Gold Foil Paper Michael's
Stamps: Salutations Paper Smooches, On Target Mama Elephant
Ink: Silver Mr. Huey Studio Calico, Gold Encore Tsukineko
Tools: Circle Dies, Corner Rounder WRMK

Thursday, February 21, 2013

Gracias

Looking for The Craft's Meow Release Blog Hop?  Click HERE or scroll down!

Hey there!

I played along with Paulina's 10 Minute Craft Dash last night during my crafty session, and wanted to share the results.  I actually like the 10 minute challenge, even though my heart gets to pumping so hard and I start to get all nervous that I will FAIL!  It's just plain fun.


Well, I made it in time, 9 minutes 15 seconds...phew!  Don't mind the totally archaic phone you see here, haha!  I would rather spend my money on crafty goodness ;0) so I keep this old boy around!


And of course the aftermath of said crafting...it's actually not as bad as I thought it would be.


A little break down of events for you:

  • Gather supplies in color pallette as well as stamps I might use.
  • Decide I need to pee before I begin, I hate to be interrupted later
  • Get out a white card base, and nervously push the start button
  • Stamp, stamp, stamp...
  • Hear snippets of the silly conversation my son and husband are having in the living room, hm..no baby crying = good news
  • shut the door
  • Put strips of pink paper on, hate it, because they don't match the pink ink, rip strips off and wonder what to do about the glue stuck on the card front
  • check time, shriek because I have less than 2 minutes left
  • Cut the card down
  • Grab a turquoise base, put the panel on using foam and stamp my sentiment in the corner
  • Quickly slap rhinestones onto it
  • Sigh with relief, I did it!
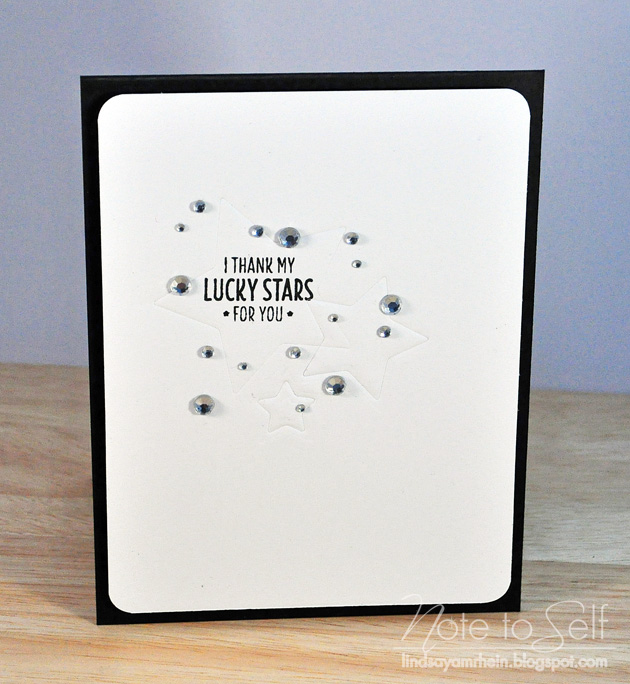
I used a couple of Paper Smooches sets, Good Gab, and Whirlygigs for this :0) Here is the graphic:


Now, how bout a little baby love while you're here?  I knew you'd agree!


My little cutie at almost 2 months!  This little guy smiles and coos like crazy, he's my easy-going baby, sleeps pretty well at night and naps very easily.  I always tell John that I earned this one.  My first was a firecracker and still is!  Thank you for humoring me.  Have a good one!


Supplies-
Paper: Candy Necklace, Marshmallow Bazzill
Stamps: Good Gab, Whirlygigs Paper Smooches
Ink: Turquoise Gem Tsukineko, Fuchsia, Chocolate Fresh Ink
Embellishment: Rhinestones Michael's
Tools: Corner Rounder WRMK

The Craft's Meow February Release Blog Hop

Hello!

Welcome to The Craft's Meow February Release Blog Hop!  You should have arrived from Lin's blog, if not, no biggie!  Just head on over to the Blog for all the details.  I hope you've enjoyed the previews this week!  I enjoyed showing them to you!


For my card today, I chose to play with Karen's Geometric Foundations set.  Gah!  I love it so!  I started by stamping the zigzag in a rainbow of colors and over stamping with the open zigzag over the colors.  Last, I stamped my sentiment.  I then matted the panel onto a black card base.


Your next stop on the hop is the talented Lynn Mangan.  Head on over to see what she has for you!

So, wanna win all the sets from this release?  Well, head over to The Craft's Meow blog, and leave a comment for a chance to win!


Wednesday, February 20, 2013

Wplus9 Monday Mood Board Challenge: Birthday Wishes

Please scroll down or click HERE for my TCM Release Preview card...


Hello again!

Ah, my stamps finally arrived after literally 10 plus days floating around the south!  I honestly thought they were lost!  Well, I had to ink them up as soon as I could get them open and I used the latest Mood Board over at the Wplus9 blog for my inspiration.


I started with a panel, die cut the window using the Label 3 die, added some stamped leaves, and layered up the flowers, using the colors Coral, Navy and Kraft, finishing them off with some pearls.

Sorry to post and run, I do believe I hear a baby crying...


The Craft's Meow Release Preview- Soaring High & Rejoice

Hola!

It's the last day of sneak peaks for the February release at The Craft's Meow!  The two sets today, Soaring High and Rejoice,, are so lovely!


Soaring High, designed by Nina is a little 4x4 set perfect for those hard to create sympathy cards.  I took the bird image and stamped it repeatedly in three different colors and added my sentiment, some black pearls and a patterned paper strip.


The next set, Rejoice by Kaitlyn Long, is a fabulous spiritual set!  Love this one!  To start, I stamped Faith onto my white card base, heat embossed a Bible verse onto a vellum strip and adhered it around the card front.  I then added a strip of patterned paper and a stamped and cut out cross, to which I adhered it with foam.


Well, that is all she wrote folks!  All the sets will be available tomorrow!  Again, leave a comment on The Craft's Meow's blog for a chance to win one of these, and I will see you tomorrow for our blog hop!


Tuesday, February 19, 2013

The Craft's Meow Release Preview- Geometric Foundations

Hi!

Oh my friends, day three of The Craft's Meow previews brings a set I am lovin'!  Karen Baker did it again, with her foundations collection.  Geometric Foundations is in a word, awesome!


I couldn't stop using it and made a couple of cards to share.  For this clean and simple card, I stamped the arrow image on both ends of my card after stamping one of the sentiments.  Super simple!


On the next card, I used a LO from Maile's card here, stamping one of the strip images onto a panel and adding twine and my heat embossed sentiment strip.  Of course, I added those awesome Epoxy Dots to finish it off!


Thanks again for stopping in to see!  Check out The Craft's Meow blog and leave some love over there for a chance to win this set!


Monday, February 18, 2013

The Craft's Meow Release Preview- Easter Blessings

Howdy!

Day 2 of The Craft's Meow sneak peaks brings a fabulous Easter set designed by the talented Karen Baker over at The Bald Dragonfly called Easter Blessings.


I started with a cream card base, stamping the adorable animals in pastels on a cream panel.  I then adhered it to my base, added a Kraft strip and stamped my sentiment in two parts.  I then finished it off with a couple of Studio Calico buttons and an inked paper strip.


Thanks for joining me today, remember to leave a comment over on The Craft's Meow Blog for a chance to win this set.  Have a great one!


SITE DESIGN BY DESIGNER BLOGS