Tuesday, January 31, 2012

Just For You

Please scroll down or click here for my Paper Made Bakery Kit post

Hello!  I am so glad you stopped by today.  This is the second post with a tutorial today, so bear with me, there are a lot of pics to wade through!  For my project, I used a super cute image from Birdie Brown, who is sponsoring us this week at the Ribbon Carousel Challenge.  Check out her super cute images here.  Torico is offering three fabulous images to the winner this week!  Yeah!


I chose the super fun Little Chef image and put him on a tag.  The tag is then attached to a little cake box, which could hold all manner of goodies.  You can find the templates here.


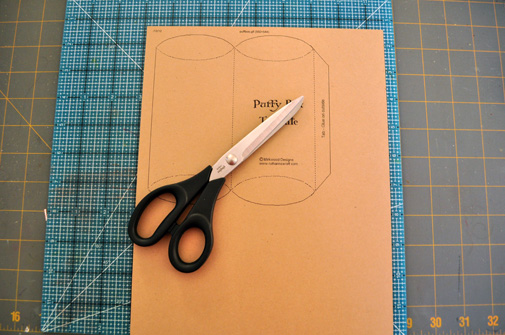
To begin, I printed my box onto white cardstock.


I then cut it out.


Taking a houndstooth stamp from GinaK, designed by the lovely Nina Bracket, I stamped it all over the box in Fresh Ink Melon Pigment ink.


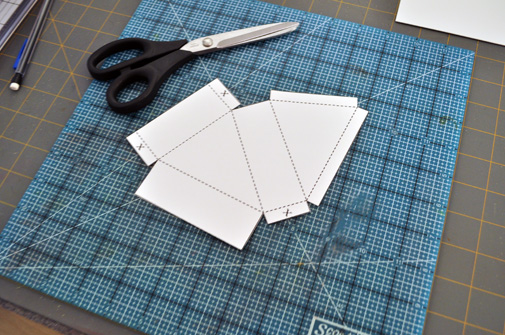
I then scored at the fold lines.


Added Scor-tape and put it together.


I then wrapped some Divine Twine in black from the shop around the top of the box and set it aside to work on the tag.


For the tag, I notched the top with my Corner Chomper and punched a hole with my Crop-o-dile.


I then colored part of my image with Copic markers.


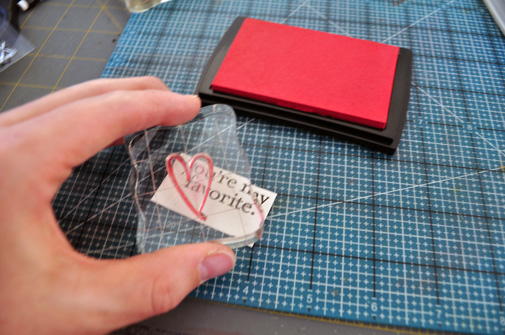
Finished it off by paper-piecing his shirt...and stamping a little sentiment


And finally attaching the tag to my box.


Phew!  You made it through!  Thank you so much for sticking with me.  I do hope you will join us this week because if there is one technique that is fun to do it is paper-piecing!

Lindsay

Supplies:
Paper: White Hallo's Papercraft
Patterned Paper: Dots and Stripes Echo Park
Stamps: Little Chef Birdie Brown, All Occasion Messages Hero Arts
Ink: Graphite Black Tsukineko, Melon Fresh Ink
Embellishment: Black Licorice Divine Twine
Tools: Corner Chomper, Crop-o-Dile We R Memory Keepers


Sweet Boy

Hello my friend!  So glad you could join me.  Today is a two post kind of day and both have some sort of tutorial on it, so be sure to check out my other post here for the latest Ribbon Carousel Challenge.


  For now I am sharing my last project with the January kit from Paper Made Bakery.  LOVE this kit, yellow is my favorite color, and these papers are full of the glorious color.  I chose to do a scrapbook page using photos of my little boy Jonathan, that I used on my LO here.  He is so photogenic and was such a good model that day, that I had to print them out and do multiple pages of him!


To start I first misted my cardstock with ink (I don't own any good spray mists...yet) and here is how I did it.


Taking my ink pad and an embossing powder tray, I pushed my ink pad onto the tray multiple times.


I then took some Perfect Pearls mist and sprayed.


After that, I mixed it with a wide paint brush and flicked it across my paper.


I then allowed it to dry, stamped my bird image from Sentimental Birds by Sweet Stamp Shop (it comes with the kit), and then added my patterned paper strips.


Lastly, I added a flower I created with the tulle that was included, simply wrapping it around an adhesive covered circle of cardstock.


I hope you will pop on over to see Shannon at the Paper Made Bakery and say hi!  Thank you so much for visiting me today!

Lindsay

Supplies:
Paper: AC Cardstock
Patterned Paper: Authentique Blissful Collection
Stamps: Sweet Stamp Shop Sentimental Birds
Ink: Harvest, Slate Fresh Ink
Embellishment: Bingo pieces, tulle, buttons from kit, American Crafts Thickers Macaw, Tim Holtz Tiny Attacher
Tools: Ranger Perfect Pearls Mist

Monday, January 30, 2012

Turn Up the Music...

Hey there!  Ah, Monday.  How did that happen?  I can never quite get over how fast my weekends go by.  This morning I have a colorful card for you using the Old School Rock stamp set from the Sweet Stamp Shop.  This is my last post as a Sweet Tooth Girl and I just wanted to thank Nicole for allowing me the privilege to design with her adorable stamps!  So, thank you Nicole, best of luck to you!


To start, I stamped the speaker image onto a white card base randomly and at different heights, then adhere some patterned paper from MME at the top.  Lastly, I stamped my sentiment and tied around some twine.


Here is a look at the set I used.


Thank you so much for stopping by!  I will be back tomorrow with not one, but TWO posts, both with tutorials!  Have a great one!

Lindsay

Supplies:
Paper: White PTI
Patterned Paper: Lime Twist My Mind's Eye
Stamps: Old School Rock Sweet Stamp Shop
Ink: Red Currant Fresh Ink, Tuxedo Black Tsukineko
Embellishment: Red/White Twine Whisker Graphics
Tools: Bracket Border Punch Fiskars

Saturday, January 28, 2012

Gma & Me

Hey there!  I just wanted to stop by and share a layout I did today while at Archiver's with my girls!  We had a blast and amazingly I managed to make a scrapbook page!  I picked up some October Afternoon Spray mists and tested the blue on my page.  I was also inspired by the latest Moxie Fab World Die cut challenge!  Those include the labels, clouds and stars.


If you have any questions about what I did here, let me know.  I hope you have a great one!

Lindsay

Supplies: 
Paper: White AC Cardstock
Patterned Paper: Little Boy Echo Park, Lime Twist My Mind's Eye
Stamps: Label Basics PTI
Ink: Grass Pigment Amuse Studio, Rocket Age Spray Mist October Afternoon
Embellishment: Thickers American Crafts
Tools: Star dies, label die, Cloud die PTI, Distresser Tonic, Copic Multi-liner

Friday, January 27, 2012

The New Ribbon Carousel!

Hey my friend, I wanted to pop in quick and share something really exciting with you!

Today is a big day at RibbonCarousel.com. We are debuting the Brand New Ribbon Carousel© today and, of course, doing a giveaway on our Blog too!  Here are the details:


 The Ribbon Carousel© is made out of White Marine Board Plastic (High Density Polyethylene), giving it a textured top with smooth scrolled edges.  Each Carousel comes with 8 Clear Acrylic rods allowing for many different configurations.  You can use it as a 4, 5, 6 or 8 post Carousel, depending upon your individual needs.

The Ribbon Carousel© holds up to 60 rolls of 3/8" ribbon using 4 rods, 40 Wooden Spools or 16 spools of your favorite Baker's Twine using 8 rods. It SPINS around on a lazy susan, allowing you to access your ribbon and twine easily! This easy-to-use organizer is compact, with a footprint less than 7" square on your workspace. The Ribbon Carousel© holds ribbon spools of any size up to a 4" diameter. Minimal assembly required.

 To use: Simply unscrew the knob on top of the Ribbon Carousel©.  Remove the top and place your spools on the posts as desired.  Replace the top by lining up the rods to the holes in the underside of the top.  Replace the knob to secure the Ribbon Carousel.
 Specifications: Each Ribbon Carousel is approximately 6.85" square and 13.5" tall.  The manufacturing and assembly of eachRibbon Carousel© is in Washington State, USA.
 Now head on over to the Ribbon Carousel Blog or FB page to be entered in our Giveaway! 

Really exciting right?  I can't wait to get my hands on this!  Thanks so much for stopping by!

Lindsay

Wednesday, January 25, 2012

Elegant Congratulations

Hello my friend!  I hope you are having a great week, mine is speeding by!  I haven't had any inclination to craft this week and literally forced myself to the table.  For some inspiration I headed to the Moxie Fab World blog and chose the Embossing/Debossing Challenge.  I heart my embossing folders!  Here is what I came up with.


Starting with an aqua piece of cardstock, I debossed it with Lifestyle Crafts Dainty folder, adhered it to a white card base and rounded the corners.  I then added some yummy pink ribbon from The Ribbon Carousel store, along with a black button, white ribbon and a leaf die cut.


Lastly, I stamped a sentiment from Wplus9's Heartfelt Mix and called it done.


I hope you have a fabulous day!

Lindsay

Supplies:
Paper: White Hollo's Papercraft, Aqua Mist PTI, Black TPC
Stamps: Heartfelt Mix Wplus9
Ink: Tuxedo Black Tsukineko
Embellishment: Black Button PTI, Satin white ribbon Offray, Hot Pink Ribbon Ribbon Carousel
Tools: Dainty Embossing Folder Lifestyle Crafts, Leaf branch Sizzix, Corner Rounder We R Memory Keepers

Tuesday, January 24, 2012

Paper Made Bakery January Kit In My Thoughts

Hello there!  Thanks for stopping by today!  I have a little CAS card to share with you using the January Kit from Paper Made Bakery.  They teamed up with Sweet Stamp Shop this month and Sentimental Birds is included in this lovely kit.  You can check it out here.


For my card I was inspired by Julie Ebersole's fun CAS design she did here.  I just used the included Bazzil card base and Authentique papers included in the kit and made it uber simple.


Hop on over to the Paper Made Bakery blog and check it out!  Have a great day!

Lindsay

Supplies:
Paper: Bazzil cardstock, Cream PTI
Patterned Paper: Blissful Authentique 
Stamps: Sentimental Birds Sweet Stamp Shop
Ink: Chocolate Fresh Ink
Tools: Med Circle Punch Fiskars, 1/4, 1/2 in Circle Punch EK Success

Saturday, January 21, 2012

You Mean the World To Me

Me, again!  How are you this fine Saturday?!  Great I hope.  I am coming up under the wire with this challenge card, but I had to play along!  Cath over at The Moxie Fab World has a fantastic challenge from the pages of Paper Crafts Jan/Feb issue...Maps!  Here is what I came up with.


Starting with a white card base, I adhered die cut flowers made from the Tattered Flowers Die from Tim Holtz/Sizzix.  I then popped up the centers with some foam and added a couple of buttons.


Lastly, I stamped my sentiment from Hero Arts Live & Laugh set and adhered a die cut heart.


I hope you have a fabulous weekend my friend, thanks so much for stopping by!


Lindsay

Paper: White Georgia-Pacific, Berry Sorbet PTI
Patterned Paper: Boarding Pass October Afternoon
Stamps: Live & Laugh Hero Arts
Ink: Tuxedo Black Tsukineko
Embellishment: Berry Sorbet Buttons PTI
Tools: Heart Punch EK Success, Corner Rounder We R Memory Keepers

Friday, January 20, 2012

Heartfelt Sympathy

Hello, hello!  Happy Friday to you!  I have a little card to share using some fun rub-on's from K & Co. that I purchased quite awhile ago.  I don't usually gravitate towards rub-on's but these looked too lovely to pass up, that and I think they were on sale {wink}.


I paired it with Kraft, yes I know I just had a Kraft and black project...love the combination!  I simply adhered the rub-on to my card base, stamped my sentiment and adhered some rhinestones.  Lastly, I rounded the bottom corners.


Do you have any plans for the weekend?  Hopefully there will be some crafty time in mine, but the mojo seams to have taken a nose dive and I have no inclination to craft.  We shall see and if I do craft this blog will be the first to know.  Hugs to you my friend!


Lindsay

Supplies:
Paper: Kraft PTI
Stamps: Guiding Light Wplus9
Ink: Graphite Black Tsukineko
Embellishments: Rub-On Brenda Walton Flora & Fauna K & Co.
Tools: Corner Rounder We R Memory Keepers

Thursday, January 19, 2012

You're My Favorite Pillow Box

Hey there!  I am back today with a fun little project I put together.  I found some really fun, free packaging templates last week and decided to give one a try.  I decided on a pillow box, nice and easy and cute.

Here is a little peek at my project.


To start, I printed off the template using Kraft cardstock


I then cut it out, and scored along the lines.


Taking the fabulous Starburst wood stamp from Hero Arts, I stamped the image all over my box.


Taking Scor-tape, I sealed the edge and folded in the ends.


Taking a piece of cream cardstock, I stamped my sentiment from The Craft's Meow's All You Need Is Love set.  I then stamped some hearts in pink, hot pink and red.


Using black ribbon from The Ribbon Cariousel, I tied it around my package and secured the tag with twine.


All that is left is to fill it with some yummy goodies to give to someone special!


Thank you so much for stopping by today!  I hope you have a great one!


Lindsay

Supplies:
Paper: Kraft Hallo's Papercraft, Rustic Cream PTI
Stamps: Starburst Hero Arts, All You Need Is Love The Craft's Meow
Ink: Sugar, Red Currant, Fuchsia Fresh Ink, Graphite Black Tsukineko
Embellishments: Black Ribbon, Twine The Ribbon Carousel

 
SITE DESIGN BY DESIGNER BLOGS